
Hello Everyone!
This is Tushar.
Today, I am going to tell you how to create a surface reflection of any element/object in your UI.
When you run this, you will feel that your element/object is placed on a glassy surface and its reflection is shown on that surface. Isn't it great?
Well, here you just need to follow following steps:
1. Open Expression Blend and create a new project.(Here our project name is MyWPFProject.sln)
2. Here we'll create a reflection for some buttons. For that we'll create our own styles for that button and give it the surface reflection effect.
3. First select Window from Object and Timeline and set its background to Solid Color Brush with background color Black. Select a rectangle from Toolbox
and draw it inside the window. Since we are going to develop a
rectangular button, hence we have selected rectangle. You can select
other shapes also as per your need.Apply Gradient brush to the rectangle
by selecting the rectangle from Object and Timeline Panel and in
the Brushes section, select gradient brush and apply your favorite
color. You can change the effect of gradient fill by applying brush
transform tool.First Select your rectangle from Object and Timeline panel and then select Brush Transform Tool from toolbox. Now
you can see an arrow over selected rectangle. Just adjust the position
of the arrow so as to change the extent of the fill of gradient brush in
the rectangle.
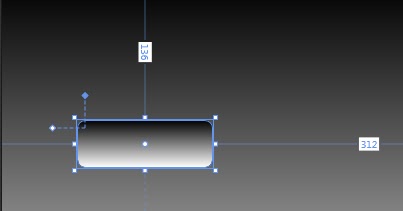
4. Lets apply some curved fill to the rectangle so that it should look like as a button. For that select the rectangle from the Object and Timeline Panel and click on Select tool.Now adjust the position of the handle shown at the top-left corner of the selected rectangle.You can see the radius of the rectangle corners changing.
5. Now to create a reflection, Copy the rectangle and paste it.Now name it as the reflection of the original rectangle.
Here we name it as Rectangle_reflection. Select this rectangle and Go to Transform section in Properties panel and select Flip Tab.Click on Flip Y Axis. Now you can see the rectangle is flipped
6. Keeping Rectangle_Reflection selected go to Brushes section and select Gradient Brush.Now select one of the dot and change its Alpha to 0.Also Change its Stroke to No Brush Now you can see that from one edge, the rectangle have no edge.
This is Tushar.
Today, I am going to tell you how to create a surface reflection of any element/object in your UI.
When you run this, you will feel that your element/object is placed on a glassy surface and its reflection is shown on that surface. Isn't it great?
Well, here you just need to follow following steps:
1. Open Expression Blend and create a new project.(Here our project name is MyWPFProject.sln)
2. Here we'll create a reflection for some buttons. For that we'll create our own styles for that button and give it the surface reflection effect.
 |
| Brush Transform Tool |
 |
| Making rectangle curved corner |
5. Now to create a reflection, Copy the rectangle and paste it.Now name it as the reflection of the original rectangle.
Here we name it as Rectangle_reflection. Select this rectangle and Go to Transform section in Properties panel and select Flip Tab.Click on Flip Y Axis. Now you can see the rectangle is flipped
 | |
| Setting Alpha value to 0 |
7. Apply brush transform tool to Rectangle_Reflection and adjust it such that the rectangle looks as the reflection of the original reflection.
8. Now select both the rectangles and from Tools menu select Make Button... and give appropriate name for the button style resource and click OK.Now right click on created button and select Edit Template[Control Part] and click on Edit Template.
 | |
| Editing Control template of the button |
Here adjust Content Presenter such that it should be over the original rectangle. and end complete template editing.
 |
| Adjusting position of Content Presenter |
9. Now copy this button's two more instances and set their content properties. You can apply different styles and triggers to these buttons as I have explained in my previous blog Developing a Custom Button [WPF].
10. Now right click on your window and click on Startup and run the project.
 |
| Final Output showing 3 instances of buttons with surface reflection effect |

